Mastering Slimline Card Sentiments with Cricut Fonts
There is a specific, frustrating moment in cardmaking that every crafter knows. You have a beautiful layout, a stunning color palette, and a vision for a slimline card that is going to knock someone's socks off. But then you reach for your sentiment stamps, or the stickers in your drawer, and nothing fits. The phrasing is wrong, the size is too big, or the style just clashes with your modern floral design. This is exactly why learning to create your own custom sentiments using fonts in Cricut Design Space is a game-changer. It moves you from relying on what you have in stock to creating exactly what your project needs, ensuring that your typography is as intentional as your paper choices.
The Power of Custom Typography in Paper Crafts
While we often talk about typography in the context of digital branding or website design, the principles apply just as powerfully to physical paper goods. When you design a slimline card, you are essentially creating a piece of editorial layout. You have a canvas—long and narrow—and you need to balance imagery with text. In the intermediate class, Miss Carrie demonstrates how to bridge the gap between owning a font and actually utilizing it to its full potential. By mastering the offset tool in Design Space, you unlock the ability to turn standard digital text into professional-grade embellishments.
One of the key takeaways from this method is the difference between a "layered sentiment" and an "outline sentiment." These are not just stylistic choices; they are structural elements that add depth and dimension to your work. Think about high-end packaging design or luxury invitations. They rarely feature flat text. Instead, they use shadows, bevels, and outlines to create a tactile experience. By learning to manipulate the offset distance, you can create a shadow layer for your text that gives it a 3D pop, making it stand out against busy patterned papers or textured cardstock.
From Digital Pixels to Physical Dimension
The beauty of using fonts you own—rather than pre-made SVG files—is the versatility it offers for visual consistency and brand recognition. If you are a small business owner who sells handmade cards, or perhaps you run a stationery brand, using a consistent typeface across your product line is vital. It helps build a recognizable identity. However, buying a separate SVG for every sentiment you want to write is cost-prohibitive and limits your creativity. When you understand how to manipulate text in Cricut Design Space, you can type out any phrase—whether it’s "Happy Birthday," "Thank You," or a custom quote—and instantly prepare it for cutting.
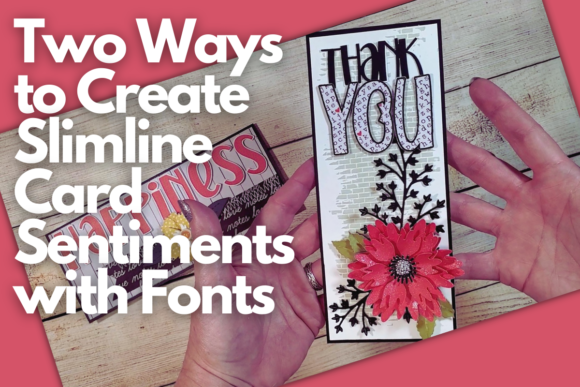
This skill is particularly valuable when working with modern typography trends. We are seeing a rise in the use of bold display fonts and handwritten scripts in social media graphics and digital marketing assets. These styles translate beautifully to slimline cards. A bold sans-serif font paired with a delicate script creates a visual hierarchy that guides the eye. In the class project, you will see how pairing a strong sentiment with layered three-dimensional flowers creates a balanced composition. The text doesn't get lost in the foliage; rather, the structural integrity of the cut letters holds its own against the soft, organic shapes of the flowers.
Practical Applications Beyond the Craft Table
Mastering this technique opens doors far beyond simple greeting cards. Once you are comfortable with creating layered and outline sentiments, you can apply this workflow to a variety of creative and commercial projects. Consider the impact of a well-designed font pairing on your overall brand identity. Here are a few ways this skill set translates to broader design needs:
- Logo Design & Branding: Creating mockups for logos often requires manipulating text. Understanding how to outline text and create negative space is essential for designing logos that are scalable and professional.
- Packaging Design: If you create product labels or packaging for small batches, knowing how to create a "kiss cut" or a shadow layer for your text ensures your branding is legible and visually appealing.
- Social Media Graphics: The ability to layer text over images, using the offset tool to create a drop shadow, makes your Instagram posts or Pinterest pins more readable and engaging.
- Editorial Design: Whether you are making zines, lookbooks, or print materials, the manipulation of serif and sans-serif fonts to create emphasis is a fundamental design skill.
The workflow taught in this class—specifically the "Two Ways to Create Slimline Card Sentiments with Fonts"—is essentially a lesson in vector manipulation. When you learn to use the contour and offset tools effectively, you are learning the same skills used by graphic designers in Adobe Illustrator, just within the Cricut ecosystem. This makes it an accessible entry point for hobbyists who want to achieve professional results without a steep learning curve.
Selecting the Right Typeface for the Job
Not all fonts are created equal, especially when it comes to cutting machines. While a delicate, ultra-thin script might look gorgeous on a website, it can be a nightmare to weed on a Cricut. When choosing a premium font for your card sentiments, you need to balance aesthetic appeal with functionality.
For the "outline sentiment" technique, you generally want a font with a bit of weight to it. A heavy sans-serif or a bold handwritten font works best because when you create the offset and slice out the center to make the outline, you still need enough "meat" on the letters to be stable. Thin, wispy fonts can fall apart when the center is removed. Conversely, for a "layered sentiment," where you are stacking a shadow behind the main text, a medium-weight script or serif font often looks stunning because the shadow adds the necessary visual weight to make it pop.
It is also worth considering the "personality" of the font. Is your card whimsical? A rounded sans-serif might work. Is it elegant? A high-contrast script is likely the better choice. Just as a web designer selects typography to match the tone of a blog post, a card maker must select a font that communicates the emotion of the sentiment. In the class resources, you are provided with a flower graphic and a font to download, which allows you to see exactly how a professional pairs a display font with an illustration. This is a masterclass in font pairing—seeing how the curves of the letters interact with the curves of the botanical elements.
Elevating Your Craft with Professional Techniques
The difference between a homemade-looking card and a boutique-quality card often comes down to the finishing touches. A flat sentiment adhered with tape is functional, but a sentiment with a shadow layer cut from foam tape adds a tactile experience that recipients love. It shows an extra level of care and craftsmanship. This technique is particularly effective on slimline cards because the elongated format provides plenty of "white space" (or colored space) for the eye to rest, allowing the dimensional text to truly shine.
Furthermore, this approach is incredibly efficient for small business owners. Instead of inventorying dozens of pre-printed sentiments, you can stock a variety of cardstock colors and print on demand. If a customer requests a specific phrase for a wedding invitation or a corporate thank-you note, you can create it instantly using your library of commercial fonts. This agility is a massive competitive advantage in the handmade market.
Ultimately, learning to create these sentiments is about taking control of your design assets. It’s about moving from being a consumer of pre-made designs to being a creator of unique visual communication. Whether you are making a card for a friend or designing a marketing asset for a client, the ability to manipulate text with precision ensures your message is not just read, but felt.